
Experiments, Natural Gardening
Stevia Plant
I have been a fan of the sweet herb stevia for a while now. Ever since I met a lady who wanted to start a business making cakes and deserts for diabetics. This was back at the turn of the century. She started her business before finding out that stevia was not allowed to be used in the commercial preparation of foodstuffs. It was against the law.
Go to this bit of a rant about stevia I did a couple of years ago. stevia
Stevia is now an allowed input for foodstuffs. Coca Cola now even use it as an input.
You may have read in one of the posts that I grow soybeans from time to time. I want to produce a traditional soy bean drink for our own use. My partner has a bit of a sweet tooth so I want to grow some stevia to sweeten the soy drink.
I finally got around to getting some stevia. I had looked on a number of occassions and plants looked overpriced to me, they were up around $12 to $18 and postage was another $12 or so. Most of the stuff I read about growing from seed said it was difficult and I was finding it hard to source some seeds.
Stevia Growing Kit
Finally I found the lolly plant at Bunnings. It is a Mr. Fothergill seed raising kit for kids and priced at $3.98. I have planted the seeds and done everything by the instructions and you can see it all via the pictures below.

One of the Stevia Lolly Plant Grow Kits available from Bunnings. You may have to squint to read the instructions as it was hard to get a clear photo off a round container.

The growing media is a dried compressed media like coconut fibre. You add a cup of warm water and wait about 10 minutes or so for the water to be absorbed. There were nine seeds in the packet and they are small.
After pushing nine indentations in the growing media with a pencil, I wet a toothpick to pick up the seeds and dropped them in the hole.

The pencil was used to make the holes for the seeds. The long handled spoon to cover them. After taking the cardboard from the lid, it was placed on the growing cup and the stevia seeds in the container placed on a warm northerly window sill.
I should see seeds sprouting in 1 to 2 weeks. These kits were made for kids, hopefully they are adult proof as well.

Vegetable Trials
In the sub-tropical garden, winged beans are a good alternative for squash and zucchinis. They aren’t affected by powdery mildew and are quite easy to grow.

Small crisp pods that snap easily are the best for cooking
Trellis Needed
Winged beans need a trellis. The ones I am growing self seeded from a vine I had in last year, which I originally grew from seed.
Last year I didn’t write any notes about the time it takes for the vine to grow and for flowers to appear. This one self seeded. The vine come up in early Spring after the ground temperature had risen. It is in a great northerly facing location growing up the side of the carport. I strung some wire from two of the posts to give the winged bean something to hang onto.
The Green Wall
Over the spring and summer the vine grew and grew, practically making a green wall on the carport. But no flowers. I was starting to think that it was like one of those sterile passionfruit vines that don’t even produce flowers.
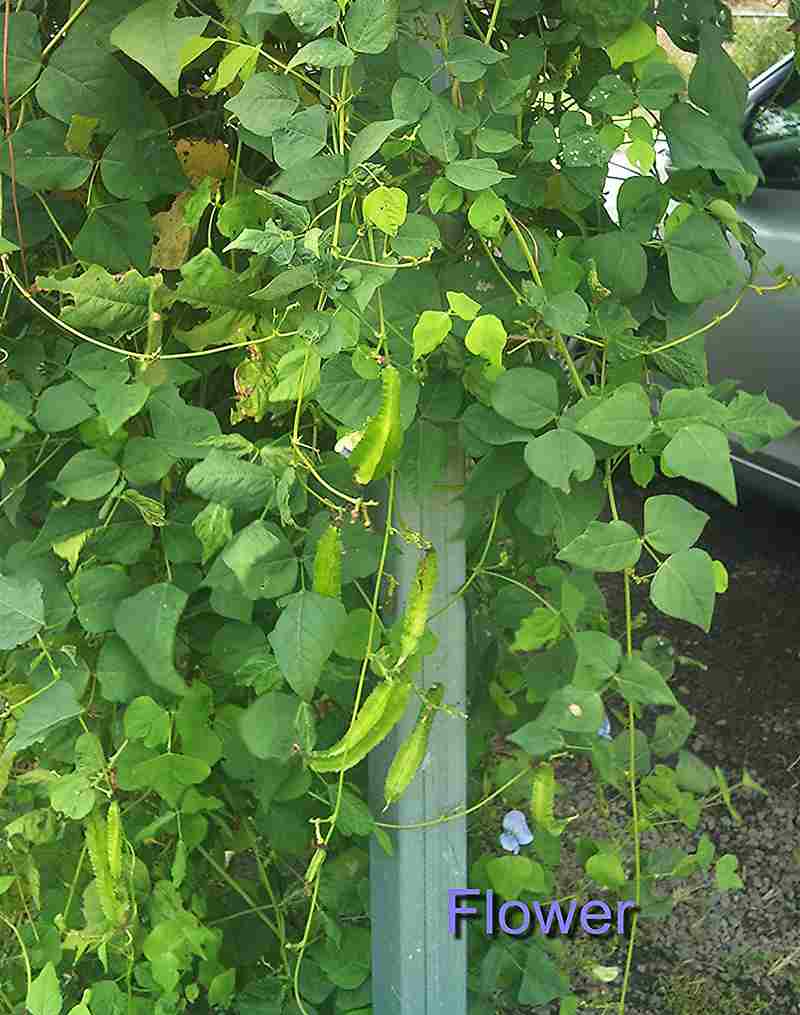
Part of the green wall
Finally some Winged Bean flowers
March heralded the arrival of the flowers. It only takes about 5 days from flower to picking the pods. Pick them when they are small and crisp. If you let them get too big they become hard and tough.
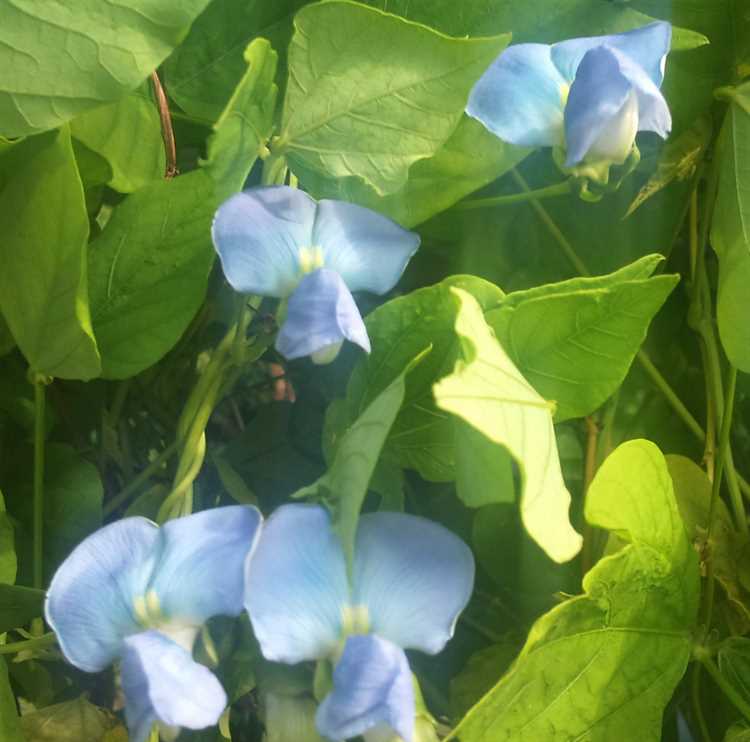
The flowers don’t last long but look good while they are there
Winged beans fruit prolifically and we have been enjoying them for 5 – 6 weeks now. There are bags of them in the crisper and friends have been receiving them as well.
Now that the night time temperatures are cooling, I have noticed that they take a little longer to flower and mature.
Cut them into bight sized chunks and and stirfry for a couple of minutes with garlic, ginger and soy sauce. Great as a green vegetable substitue.

Uncategorized
A couple of months ago I had a bit of a whinge about tree roots invading the garden. see – Tree Roots and Wicking Beds

Some of the trees only metres from my garden
I felt a bit guilty
Mixed Feelings


Oh! Mr Hart, What A Mess
In case you don’t know what the caption refers to, go here – https://www.youtube.com/watch?v=8qb4n8yc2so
They were trees next door. Can’t stop progress. Not much else to say really.
Natural Gardening, Vegetable Trials

Garlic varieties take different time lengths to sprout
Since planting the garlic I have learnt a few things so it is time for a garlic update – see Planting Garlic – Four Varieties
Originally when pIanted the garlic, I thought they would all sprout at around the same time and that sprouting would only take 4 -5 days from planting. This was my experience from previous plantings. But previously I had only planted garlic from Woolies, so my experience was probably with only one variety.
From looking at the previous post I planted the garlic on either the 21 or 23 March. The Glen Large sprouted in 4 days. It is now the 7 April and the Silver Skin is just starting to poke through, which makes 14 – 16 days to sprout. There is no sign of the Elephant Garlic yet.
It has eased my mind a bit, as I was starting to think that the winterising (putting in the fridge for 6 weeks) had affected the garlic that hadn’t sprouted. I put in a call to Green Harvest where they quelled my fears by saying that some garlic can take up to 6 weeks to sprout.

Silver Skin Garlic Poking Through after 14 – 16 days
In case you are wondering, the grass clippings beside the bed are on the walkways through the garden. I use the walkways for trench composting. At various times throughout the year, I will place all the composted material from the trench walkways onto the garden beds. I will then refill the trenches with whatever material I have, from fresh lawn clippings to semi-composted clippings and other composted material. I will also throw in some crusher dust and lime.
The lawn clippings should also generate some heat as they compost which will be welcomed by the plants as we head into winter.
If the lawn clippings have been there for a while, I will also use them as mulch and to help suppress the weeds. I don’t worry that they are a bit water repellant as the dripper lines are under them in the garden. When it rains heavily in Brisbane, it doesn’t matter how water repellant a material is it still gets soaked.
Further Update 9 April 2015
Woohoo, the Elephant Garlic has made an appearance. Two cloves of the five planted have poked their nose through. Looking forward to the rest appearing. The sprouting times are now Glen Large and Woolies garlic around 4 days, Silverskin garlic 14 – 16 days and Elephant garlic around 18 days.
