Wicking Beds
Wicking Bed Part 1
I started work on the wicking beds today. Over the last 2 weeks I have been getting
things together and today I needed to get a move on.
During my thinking and planning time, I figured out that I would need 21 sleepers that
were 2.4 metres by 20cm x 5cm. In the old scale that is 21, 8″ x 2″ 8 ft long. Originally I
did my pricing on treated pine sleepers from Bunnings at about $11.76 each. But there was a nagging thought in the back of my head about the chemicals injected into the pine
timber to make it resistant to termites and rot.
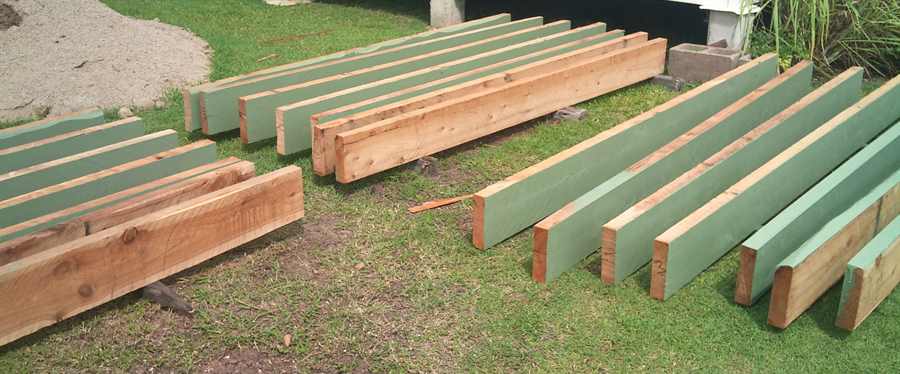
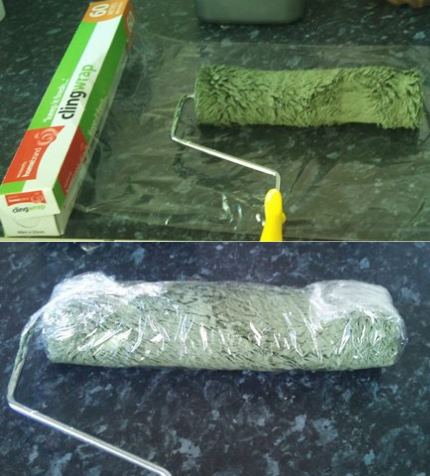
Painting the sleepers with a roller before construction of the wicking bed.
Can’t be a Hypocrite
I finally decided that I couldn’t be that big of a hypocrite. Here I was talking about
being organic and then using a product that could leach poisonous chemicals into the
garden I was growing my food in. So the frugal part of me had to give way to the logical
part that wouldn’t let me be a hypocrite.
I had to make an change in my budget. I was hoping to build a wicking garden bed that
measured 4.8 metres by 1.8 metres and 60 cm high for around $500. This was now impossible as the timber was going to be more than that.
Cypress Pine Sleepers
I finally settled on cypress pine sleepers that cost about $24.00 each, more than twice
the price of the treated pine ones. To justify it to myself, I worked out that the bed
was going to be there for minimum of 15 years so I would be thanking myself for paying
the bit extra than wondering whether I was poisoning myself and the ground by using the
cheaper option of chemically treated pine sleepers.
I purchased my cypress pine sleepers from www.cypresssupplies.com.au/. The young bloke there gave me a hand loading and as the sleepers were slightly longer than the van, also strapped down the back door. It makes your day when you get looked after. Makes it easier to justify spending your money as well.
Over time and exposure to the elements, cypress pine goes a silvery grey colour. I
decided to paint them in a eucalypt colour (a shade of green). Having opened the wallet
for the timber, I decided to invest in a dearer exterior paint. I went on the Whirlpool
forum and saw that a lot of older guys said with paint, you get what you pay for. They
also seemed to have a consensus that Dulux weathershield was the way to go. I followed
suit.

Wrap your roller in Cling wrap. It will keep the roller usable for at least a couple of days.
Setting up to paint.
Having done a bit of painting in my time, I figured that painting before building was the
best option. I set the sleepers on some timber to get them up off the ground and got out
the paint roller. I have used half of a 4 litre can to do one coat to one side and an edge. The whole can will cover them with one coat. I will do two coats.
Painting Tip
Here’s a little tip if you are new to painting. In between waiting for your paint to dry
wrap your roller in glad wrap or cling wrap. That way you don’t have to wash the roller
out as it will stay moist. You can do the same with brushes.

One coat completed before the rain
Finished One Coat
It’s Saturday morning. I got up around 6:30 to get the other side and edge done on the sleepers. The weather forecast is for showers, so I wanted to get a coat on and hopefully a few hours drying before any rain.

One coat on, hopefully the paint will dry before the rain comes.
Have to laugh
It just occurred to me that I have gone to the trouble and expense to purchase cypress sleepers instead of treated pine and I have gone and painted them so they look like treated pine. You can’t help some people.
In the next update for building a wicking bed, I will be getting a machine in to make the site level. You may have noticed the pile of gravel fines in the pictures. Thats for levelling, as there is a bit of a hollow where I want to put the wicking bed.
Natural Gardening

Don’t irrigate two weeks before harvesting garlic. I can turn off the water to this bed.
In the last post about garlic Garlic Time Coming Up I mentioned that I was waiting until the Autumn equinox for planting garlic. Well here in Australia the Autumn equinox is March 20. I would have been planting garlic today, 23 March but we had a rather protracted thunderstorm from about 3pm and it is still making its presence known at 8pm.
So tomorrow I will get my three varieties from the fridge and get them in the ground. The reason they are in the fridge is because garlic is a cold weather crop and putting it in the fridge winterises it. From what I have read, the suggestions are from 2 weeks to six weeks, with one grower storing all his garlic in the crisper as soon as it is harvested. What isn’t eaten is planted next season.

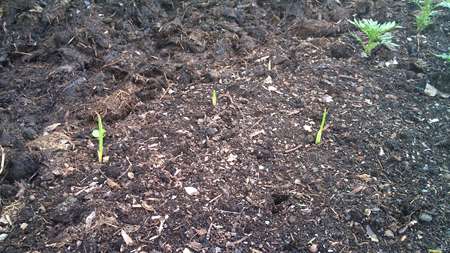
The garlic from Woolies has sprouted after a week
Winterising Garlic
I have never winterised garlic before so this is a bit of an experiment. To give me something to measure against, I purchased a pack marked Australian garlic from Woolies. It was already in cloves and in a small flatpack. There were about a dozen good sized cloves. These were planted around a week ago and I noticed today that they were poking through. My previous efforts with supermarket garlic haven’t been brilliant, so we will see how this one works.
Bed preparation.
I use the trench method of composting. Originally I dug trenches where the walkways are and built up the garden beds on each side of the bed. I then filled the trenches with lawn clippings and cardboard. I also throw some lime in and crusher dust and let it decompose and compost over the next twelve months. When it is time to renovate the garden beds, I dig up all the walkways and turn up all the composted material onto the beds. There is a bit of exercise involved which is all good. The material from the trenches is great, full of worms and seems to help everything grow.
Because of the amount of compost from the trenches that go on the garden beds, I don’t have to do much digging when planting. The soil as that loose and friable, it is a pleasure to get your nails dirty.
Getting enough lawn clippings
I have a lawn mowing contractor drop off lawn clippings from time to time. Recently he has been here every week because of all the rain we have had. If I can’t put it straight into the trenches, I pile it up and let it compost away until I need it.

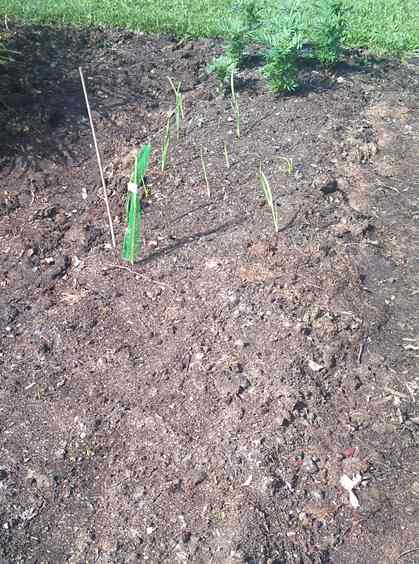
I promise the Glen Large has sprouted, you just can’t see it with the image reduction
Update
I wrote the draft for this post on 21 March and four days later the first Silver Skin Glen Large garlic was poking its nose throught the soil. The Glen Large Silver Skin and the Elephant Garlic has yet to make an appearance. I planted the cloves of the Glen Large and the Elephant deeper than the Silverskin. The smaller cloves looked like they shouldn’t be as deep.
Correction
Thank goodness I marked the beds to know which is which garlic. The Glen Large is the garlic that has sprouted, not the Silver Skin.
The green net is the bag the garlic came in with the tag showing which garlic it is. Hopefully I haven’t put the wrong bag on the bamboo stick. Anything’s possible. All’s good, I am off to buy some fish. Check out the header, I’ve started work on the wicking bed.
Vegetable Trials

Hog wild – talk about Jack and the Beanstalk
Although this stuff is easy to grow and also gives a good harvest, you have to have an acquired taste for it. I know there are millions of people in places like India and the south of the USA, Vietnam and other tropical Asian and African countries. To me, it ranks with tripe, at the bottom of the food chain.
Sure you can add it to salads and curries and gumbo, but it is slimy and tastes like shite.
I was at Bunnings and saw a couple of guys from the sub-continent looking at some Okra seedlings. I had grown it before but never eaten it so I needed to see what would happen. The last time I grew it was in South Australia and they were picked by a Vietnamese friend and prized. I was happy that someone enjoyed them.
The climate in Qld is the opposite to SA. It rains in summer here and winter in SA. They have very hot dry summers, here has hot humid summers with most times a lot of rain.
So I bought a couple of different types, took them home and planted them.

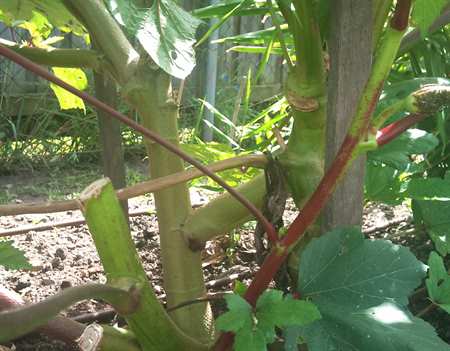
I had to remove some branches 2 months after planting
Okra pruning required
Boy can they grow. Before long, it looked like I was growing a couple of trees in the middle of the garden. They were out of control. They were in a bed that I had previously grown mung beans, so I was wondering if they had an affinity to the root dwelling bacteria that beans attract. These bacteria live in nodules in the roots and convert nitrogen from the air into a form that feeds the plant. In return the plant excretes a sugary substance from its roots that feed the microbes.
They started producing fruit after a flower appeared for at most a day before closing again. Being me, I thought the bigger the better. Wrong, I had to pick them early, when they were no bigger than my pinkie. After that they started to go fibrous and woody.

Beautiful Flower, open for a day and plenty of fruit but only edible when tiny. The small one is the right size
Okra in a Curry
So we tried some in a curry and both of us thought it was nothing to write home to mum about. In fact it didn’t rank for taste or texture. I am willing to admit that we don’t know how to cook it or present it.
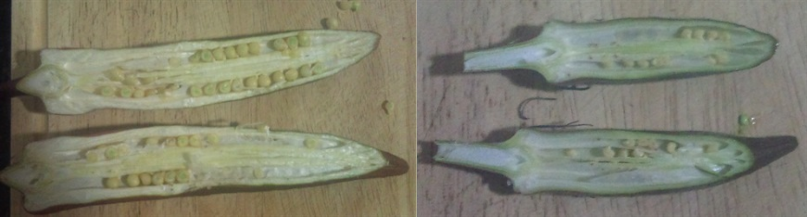
Large Okra left, small Okra right. Cut in half. The bigger the seed the more mucousy substance in them and the more fibrous the pod.
Armed with this thought that I didn’t know enough about it, I was on the lookout for a neighbour who is Indian. I’d never met them so the next time I saw them outside, I was in the garden. I cut off a couple of the fruit and jumped a couple of fences to say hullo and get some knowledge. Unfortunately I had collared mother or maybe grandmother, who didn’t speak any English. She must have been wondering who this crazy old bloke was that jumped the fence and was waving some Okra in her face.
After about 30 seconds, she grabbed the Okra said thank you and disappeared inside. I haven’t seen an appearance of the neighbours two doors up since. So I am no wiser to the attributes of Okra.
About the only thing of value that it was doing was shading the ginger. We have had a very hot summer and the Okra was helping the ginger by shading it.
When Autumn arrived, I made the grand decision to remove the Okra, It wasn’t as difficult as I imagined it would be. I cut it down to size with my Silky Sugoi and pulled it out.
My original supposition was correct. The roots, which were quite long but set shallowly were covered in nodules. They were not nematode nodules as the plant was way too vigorous. I chopped off all the roots and buried them back into the garden. Unfortunately I didn’t think to get a picture of the nodules and I don’t think I will be growing Okra again, just for the chance of taking a picture of the nodules.
To give you an idea what the bacteria nodules on a root system look like go to this post Soy Beans and Nitrogen Fixing Bacteria
I know that I am ignorant when it comes to Okra. If you feel that I need enlightenment, I am ready to listen. Leave a comment or a recipe, I am only too pleased to try it out and maybe change my opinion.
Cheers Olman
Natural Gardening
Marcia or Marsha – I agree to whichever one you like.

Ingredients in, power on, thunderbirds are go.
In the previous post Compost Tea Brewer I detailed how to make a brewer and that I would let you know how it went. I am surprised and impressed. It went better than I expected.
With these sort of remedies or therapies for plants it is a little bit like voodoo, there is no real scientific evidence to justify the claims of how good they are. I had always thought that brewing microbes would be of benefit to plants but had no real way of finding evidence based on measurable results. And at heart, I am a bit of a sceptic until I have proven it for myself. (more…)

Natural Gardening
Compost tea seems to be a bit of a favourite in the gardening world at the moment. Whether it continues is a question for the future. There have been a number of advocates for brewing compost teas and spraying them onto your plants to increase their health and for want of a better term to improve their immune system and resistance to pests and disease.
A number of names spring to mind as champions of compost tea brewing. Elaine Ingham from the Soil Food Web and another bloke somebody Storch. I remember the Storch part because of Larry Storch, who played the part of Corporal Agarn in F Troop, which when I was a kid I thought was hilarious. (more…)