

Raised beds would help when it rains heavily.
There are good reasons to have raised garden beds.
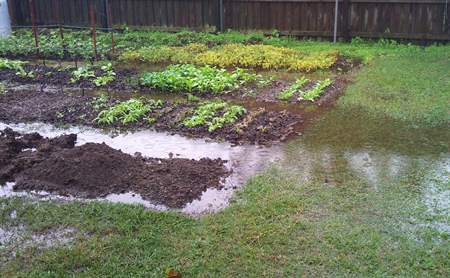
- keeping your plants from being flooded(see picture)
- not having to dig through tough soil or clay and work it into a friable soil
- attracting earth worms to do the hard tilling for you
However there are some things you have to overcome and look out for or you will find a big hole in your wallet and plants that aren’t thriving. Points to be aware of with raised garden beds If you read all the advertisements about raised bed gardens, and follow their advice, you will soon have spent a couple of hundred bucks and in return have a garden about 3 mtres by 2 metres (9ft x 6ft). Not a very big area to grow in. But this may be just what you want. If you are looking for a bigger area at a lower cost then your need to be a bit more frugal. Here is the frugal way to make a raise bed garden without the back breaking digging.
Easy Weed Removal
Remove the weeds by solarizing your ground by spreading some black plastic. The heat absorbed by the black plastic and the exclusion of light will kill the weeds. Leave the plastic through at least one summer. When you remove the plastic lay down cardboard. Scrap cardboard is available everywhere, you should have no problem sourcing it. There is something about the glue in cardboard, worms love it and are attracted to it. It is also a carbon source. Our soils grow in life, the higher the carbon content. All farmers who get soil tests done are very keen to increase the carbon content of their soil. The cardboard also retains moisture.
Hopefully, while you have been solarizing your future garden patch, you have also been composting your mower clippings, any compostable household waste and vegie scraps. To increase the amount of compost I had I collected old vegetables from the local fruit shop. At the start I was putting them through a mulcher, but after a while I found that they would compost just as well without that step. I also found a mowing contractor who wanted somewhere to get rid of his grass clippings. I was able to make some pretty serious compost piles. I didn’t bother turning them, just let them work away over a twelve month period. Lay down plenty of cardboard and wet it down. Start putting down a layer of compost. If you can wait, you can actually do all the composting on your proposed garden bed, rather than composting it first and then transferring to the new bed. It will mean that you have to wait until the organic material breaks down before you can start growing, but this is a lifelong project so six to twelve months is in the timeframe.
Raised Garden Beds Can Dry Out Quicker

Water gets away and garden isn’t flooded when ground level raised
With raised beds there are two main areas to be aware of. The main one is drying out. By raising the bed, you increase the surface area for moisture evaporation. You now have the top and sides that allow moisture loss. This is made worse on windy days. The cure for evaporation is twofold. Use drip irrigation on a timer. Use mulch to reduce evaporation. I don’t place mulch until after the soil has warmed up in Spring. Because mulch is a good insulator it helps prevent evaporation, but also prevents heat getting to the soil and raising the temperature for seed germination and rapid growth. Once your seedlings are established and Spring has really arrived it is good to mulch. When summer is ended and Autumn is here, you can dig the mulch into the soil. I find that is the best way to control temperature and moisture loss.
The other key to good vegetables in raised beds is minerals. By raising the bed and applying compost, the minerals in the ground are less available until the worms have tunneled up into the compost and give the plants access to the soil below the cardboard. The mineral that is of most benefit to plants is Calcium. (go here to read about Calcium) Calcium is available as lime or gypsum or dolomite lime. In Australia, produce stores usually have it in 20 or 25 kg bags. Depending where you are it is fairly inexpensive. I have sourced it from $9.00 to $20.00 a bag. If you buy it in nurseries it is usually in smaller bags and much more expensive per kilogram. Another source of minerals is crusher dust. This is the dust or fines that is produced in quarries when they make their roadbase. A number of landscaping yards have crusher dust available for sale. It is as cheap as chips and well worth digging through the garden. I can recommend this book, Bread From Stones first written in the late 1800s by a German agricultural scientist, Julius Hensel. It was translated into English around 1899. This pdf on Soil Minerilization is also worth a read. Mineralized Gardens